
If you listened to Episode 49 of the SweetGeorgia Show and shared their befuddlement on my design Ribbons and how the upper body is constructed, this post is for you!

Bottom up set-in sleeve sweaters are my absolute FAVORITE way to work sweaters in one piece, but with the popularity of top-down knitting this method seems to be unfamiliar to some. (Other designs of mine worked this way include Turners Falls Cardigan, Polonaise Cardigan, Cables 'n Cats, Kitsunetsuki Cardigan, and Praline Pullover. Can you tell this method is my absolute favorite?!) I like this method for a few reasons. As a designer, my brain groks it much more easily than top-down sweaters and I can write and grade these designs across multiple sizes without knitting them myself. (Ribbons was knit by one of my awesome sample knitters, Joni.) As a knitter, I like getting the big, boring chunks of knitting out of the way first by completing much of the body and sleeves before finishing with the more interesting yoke. And of course, you get the bonus of attractive, well-fitting sleeve caps that have the appearance of set-in sleeves without requiring any seaming!
My drawing skills aren't the best, so here's my attempt to better illustrate this construction method for you.

To reach the point shown above, you'll knit the body from the bottom up until the body reaches the underarms. For a cardigan, the body is knit flat; for a pullover, the body is knit in the round. On the last row or round, you'll bind off or set aside some stitches located under the underarms. This is so you can seam or graft the underarms closed once the sweater is finished. After that, put the body aside and knit the sleeves in the round from the cuff until they reach the underarm as well. Like with the body, you'll be binding off or setting aside a few stitches where the underarm is located before continuing. You now have one body and two sleeves...time to combine them!
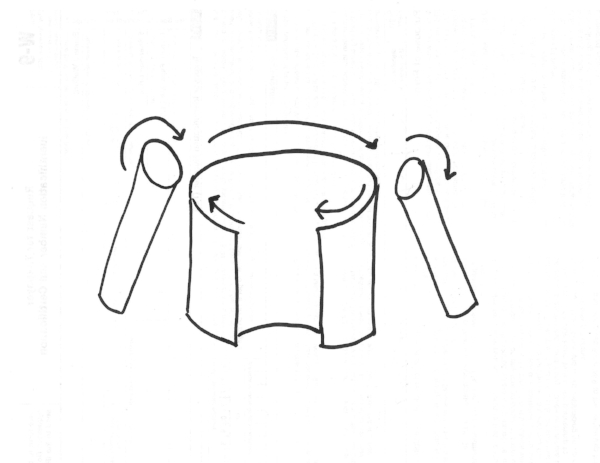
(I reused scrap paper so apologies for the text showing through a little!) This step is the most fiddly and it's helpful to use a longer circular needle at first to accommodate the large number of stitches all at once. From here on out, I'll be speaking as if you're knitting Ribbons (or a cardigan) as opposed to a pullover, but the only difference is knitting flat vs knitting in the round. Otherwise the concept is still the same.
The joining row is worked on the RS. You'll knit across the right front of the body until you reach the stitches that have been set aside for the underarm. At this location, you grab one of your sleeves and knit across all the sleeves stitches (excepting the sleeve stitches which have already been set aside for the underarm.) Once the sleeve stitches have been joined onto the same needle as your body, you continue to knit on the body on the other side of that underarm gap. Knit across the back until you reach the second underarm gap, then knit across the second sleeve stitches to join the second sleeve to the body. Continue knitting the body on the other side of the second underarm gap, and knit to the end of the row which will leave you on the left front of the cardigan. Your work should look like this now:

Arguably, you could try it on if you wanted to but it's not going to stay on due to a super wide neckline! Now we need to shape the yoke to create the look of set-in sleeves and to ensure the cardigan becomes you know, an actual wearable thing. That will stay on.
This is the part that confuses most people, since the directions can look like a mess of decreases. It helps to remember what the armhole and sleeve cap of a traditional seamed set-in sleeve look like, since we're going for the same effect. We're simply recreating it as a 3D shape, instead of working it in 2D and relying on seaming to transform it into a 3D item.

A shaped armhole (left) starts with a series of bind-offs followed by a section of more gradual decreases to create the curve needed to accommodate your shoulder movement. A set-in sleeve cap (right) is designed to match that armhole curve on the front and back armhole, so each side of the sleeve cap also begins with a series of bind-offs followed by decreases. You'll generally wind up doing more decreases on a sleeve cap than an armhole, since you're attempting to create a bell curve to ease the sleeve cap into the top of the armhole.
How does this translate into Ribbons? The instructions look something like this:
- Decreases are worked only on the body.
- Decreases are worked on both body and sleeves.
- Decreases are worked only on the sleeves.
The rate of these decreases depends on the design itself, the gauge, and the sizes offered, so these steps might not all be followed if enough decreases can be satisfactorily completed in another step. For example, my Turners Falls Cardigan is worked in bulky yarn and I went straight to Step 2 for the yoke decreases since I had far less stitches to work with and didn't need to perform decreases only on the body.
When all yoke shaping is complete, you wind up with:
- A small amount of sleeve stitches.
- Stitches on the fronts equaling the intended shoulder width.
- Stitches on the back divided into three zones: the back neck, and stitches on either side equaling the intended shoulder width. These side zones should contain the same number of stitches as the fronts.

You finish off by working 4 short row sections. The first shapes the right front shoulder while slowly eating up some sleeve stitches to create that rounded top of the sleeve cap. The second section shapes the back right shoulder and eats up the rest of the right sleeve stitches. You repeat this process for the left side, so you're left with equal sets of stitches on the front and back for each shoulder. Then you graft, 3 needle BO, or seam to join the shoulders, and graft or seam the underarms closed!
The end result?
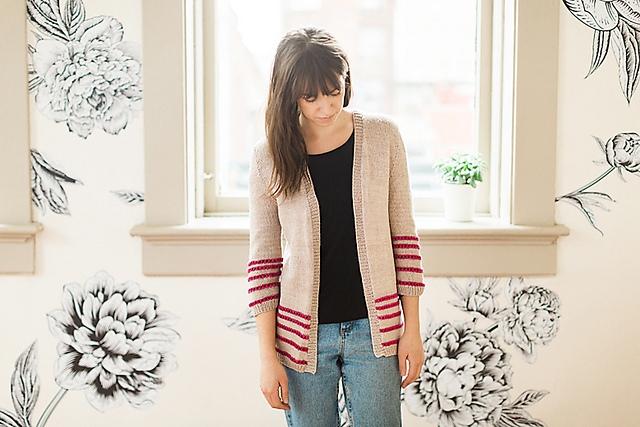
A beautiful, wearable cardigan with flattering, well-shaped shoulders and sleeves!
Are you ready to conquer a bottom up set-in sleeve sweater now? Let me know if you enjoyed this post and want to see more technical content from me!

