selfpublished

Summer Shawl Bundle

For the month of August, I am offering a Summer Shawl Bundle: 4 shawl patterns for $12!

Untitled design (5).png

All four patterns use fingering weight yarn, and are great options for stashbusting or cranking out one last sweet summer project. Clockwise from top left, they are:

Advice From a Caterpillar, a triangle shawlette with a ribbed and cabled stitch pattern. This is the smallest shawl of the bundle and requires the least yardage. Shown in Gynx Yarns Single Merino, it requires 400 yards and measures 39" x 15.5".

Klystron is an asymmetrical shawl knit on the bias in two colors. It's knit mostly in garter stitch, with brioche stripes, and you'll need to understand intarsia to knit this. Shown in Shalimar Yarns Aerie, it requires 700 yds (420 yds MC & 280 yds CC) and measures 72" x 21".

Papelillo is a lace pi-shawl, worked from the center outwards. The lace patterns are both written and charted. Shown in Dragonfly Fibers Pixie, it requires 950 yards and measures 34" in diameter.

San Drea Shawl is another asymmetrical shawl, this time with stripes, short rows, and a lace border. This one is definitely a good stashbuster! Shown in Manos del Uruguay Fino (MC) and Shibui Knits Staccato with Nylon (CC), it requires 850 yds MC and 110 (120, 130) yds of CC1 (CC2, CC3) and measures 80" x 24.5"

Which one would you knit first?

New Pattern Release: Klystron

Earlier this week I released my Klystron shawl pattern!

All photos by Lindsey Topham

All photos by Lindsey Topham

I wanted to play with color and texture in this pattern, so I combined garter stitch, brioche, and intarsia. This asymmetrical shawl is knit end-to-end. It uses intarsia to create a smaller accent panel of contrast color (the purple) which runs along side the main body of the shawl, while regular rows of brioche interrupt the garter stitch fabric. Shaping is worked at the ends of rows and on either side of the off-center spine, to separate out the two colors and to create an unbalanced arrow shape at the end after binding off:

The yarn is Shalimar Yarns Aerie, which is a gorgeous single-ply blend of merino, kid mohair, and silk. Thanks to the silk and mohair, the yarn has a subtle sheen and slight fuzz which really elevates plain garter stitch to the next level. 

Klystron is available for purchase on Ravelry for $5.

2016 Retrospective

I'm back from my self-imposed 'winter vacation' (reduced social media presence and less design knitting), which was great! I really enjoyed the extra time to relax, work on some personal projects, and play Rise of the Tomb Raider. I know, I'm behind in my video game releases. I don't even try to play things right when they come out, I just get to them when I get to them! Like Fallout 4, which I still haven't finished... Any gamers in the audience, by the way? Comment and tell me your faves!

Ok, back to knitting which is what most of you are here for! At the beginning of 2016, I was working part-time in order to devote more time to my design business in hopes of growing it. Then I was offered a promotion to a full-time position and I decided to take it, which threw quite the wrench in my business plans for the year. Ultimately, I'm really satisfied to be back in the workforce and I'm proud of what I was able to accomplish this year as a nights-and-weekends-only designer.

  • I released 11 self-published designs and saw 11 designs released from third parties for a grand total of 22 new designs!

Self published designs:

Third party designs: 

  • I ran another successful Instagram KAL in conjunction with Spun Right Round in the fall.
  • I started my weekly newsletter.
  • I grew my Instagram following to 1k.
  • I hired Knit Fitch to design my beautiful new logo & brand package.
  • And I came up with some great creative content this year, like EmSweWeMo and hosting my first ever sweater auction for charity.

I have a bad habit of never feeling like I am doing enough, but looking back at 2016: I did enough. I did MORE than enough.

What are you hoping to see from me in 2017? I have some ideas up my sleeve, but I'm also open to suggestion! 

The Journey

As I briefly mentioned on Instagram earlier this week, I've been struggling with some wrist/forearm pain and haven't been knitting much. It's from computer use at work, especially the Photoshop-heavy days, but my desk at home isn't ergonomic either. A keyboard tray for my work desk arrived at the end of day on Friday, so I've got that to install on Monday, and I ordered a new computer desk for my home office that is shorter, more compact, and has an included keyboard tray. I also availed myself to my doctor, who advised I wear wrist braces to sleep in and has referred me to a physical therapist. Fingers crossed that I get sorted out soon, but I'd love any words of advice or encouragement from others who work 8+ hours a day on a computer and have dealt with similar issues! Luckily, I don't have any immediate deadline knits lined up so I'm not actively sabotaging my work, but you know, I really want to knit.

I've been trying to keep myself occupied with other things, and am using the new computer desk as the impetus to move into Stage 2 of the home office organization/set-up. I was sorting through a big pile of papers that needed to be filed and in the process decided to clean out my file folders. I found a bunch of documents from my original designing days and wowee! A) What a walk down memory lane and, B) I'm like, a really professional designer now in comparison. Sometimes I feel like I'm still muppet-flailing my way through this whole thing so that was a nice moment.

Before I got comfortable with writing patterns in full before knitting them, I wrote it out as I knitted the sample, line by line, and then graded it afterward. (In front, the Dreamer's Braided Pullover and in back, the Holla Back Tank on pink Hello Kitty notebook paper!) That's problematic for grading purposes, since you can easily make design decisions that fit one size but don't scale up and down nicely, but also omg, so much work writing it BY HAND ON PAPER.

I definitely prefer to do things on paper when I can, but I've made myself transition to digital because it makes more sense in the long run. At this stage, I didn't have charting software available so I used graph paper to figure out colorwork and cable charts. (Above is the Free Cecily Hat and below, Wavy Gravy Mittens.) The thumb on the left mitten was erased and re-drawn multiple times as I tried to figure out how I wanted to handle it!

And of course, hand drawn schematics to round it out, seen here as the Praline Pullover! I actually still do this sometimes, even though I use Inkscape to draw schematics, because Inkscape is really annoying to use. (Just sent off a pattern's final materials this morning with a hand drawn schematic!) I use several free, open source programs and thus have had to teach myself how to use them. At times like this when I'm trying to rest my hands as much as possible, drawing it by hand is faster than messing with Inkscape. Now though, if I draw my schematic I will scan it and add the dimensions in Photoshop so there's no concern with my handwriting causing confusion.

It's cool to see how far I've come, but I still have plenty of ways to grow! I don't use InDesign like many designers do and I don't use Excel spreadsheets to grade my patterns. (Which I'm a little embarrassed to admit, I feel like I'll be made fun of for that one.) I just never got around to setting them up! It's a future goal of mine for sure but in the meantime, I'm enjoying tweaking my system as I go and being grateful for the ways I've already streamlined my process.

Butter Mellow Cowl

New pattern time!

Photos by Lindsey Topham

Photos by Lindsey Topham

Months ago I decided to start designing more from my stash. I think my stash is a manageable size compared to some peoples', but to me it feels overwhelming at times. I have good intentions when I buy yarn and try hard not to go overboard, though inevitably there's always a great deal or a limited edition something-or-other that's much harder to resist. I pulled a single skein of The Plucky Knitter Plucky Feet in this great bright yellow out of my stash and set about trying to do it justice. Thus we have the Butter Mellow Cowl!

IMG_7966sm.jpg

I never considered myself a big fingering weight or lace knitter...until now. This project kicked off a stream of fingering weight projects that I'm still in the middle of! Usually fingering weight designs make me anxious or frustrate me because they take so long and seem so fussy. For whatever reason, I really zen'd out while knitting this and just enjoyed the process, no matter how long it took.

This is a shorter cowl, meant to act as more of a decorative accent to your ensemble than provide warmth in cold-weather. Since the length as shown only uses 300 yards, it's perfect for a luxury skein with less yardage than the traditional 400+ yards many fingering weight yarns are packaged as. If you've got plenty of yarn and want it loop it around twice, add repeats of the alternating lace panels until you've reached the length you prefer!

Check out the Butter Mellow Cowl on Ravelry here.

Neon Neutral Triangle Club

The tweet that started it all. Over a year and many yards of neon yarn later, Sarah, Teresa and I are pleased to present Neon Neutral Triangle Club to you all!

Our awesome logo created by Kirsten Hipsky!

Our awesome logo created by Kirsten Hipsky!

The theme is pretty straightforward: neons, neutrals and triangles. We each designed one accessory and one garment based on our interpretation of the theme, and enlisted some killer yarn companies to support them. Because let's face it: when you are doing a collection about neon, you need some NEON.

My accessory design is Triangle Inception and it features some fancy-pantsy yarn from Rain City Knits.

Photos by Lindsey Topham

Photos by Lindsey Topham

I wanted to showcase a bright variegated colorway since I feel like those types of yarns are often neglected. They're definitely harder to design for and knit with, but they're beautiful too! I met Krista at TNNA in 2014 so she was fresh on my mind when I was thinking of neon yarn options. I love supporting indie dyers!

You can tell these photos were taken awhile ago because my hair is totally different now!

You can tell these photos were taken awhile ago because my hair is totally different now!

It's a really simple triangle shawl with a garter stitch body and knit-and-purl triangle border. The white spokes are formed by slip-stitch surface crochet after the shawl is complete, and it's easy to get the hang of even if you aren't a crocheter! Plus the RainCityKnits Super Sock MCN base is lush and very pettable.

Acute-ly Preppy is my garment design and ohmygod I'm SO HAPPY that we managed to get a jumping shot during this photoshoot!

I've worked with the folks at Fairmount Fibers before (the US distributors of Manos del Uruguay yarns) and they are just fabulous, so I was really happy when they agreed to support this venture. Maxima is a great squishy single-ply merino that has punchy neon colors, making it a no-brainer choice.

I will warn you--this is a labor of love, product knitter type sweater. It's knit flat in pieces and seamed, which a lot of people already dislike, but that means the front panel has both right side AND wrong side colorwork going on. I personally didn't find it bad at all, though since I designed it I'm clearly crazy and my opinion can't be trusted. Essentially, the front panel is stranded so you're carrying your colors across both RS and WS rows, but it's set within a larger piece intarsia-style. You knit across the front to the beginning of the panel, twist the yarns around each other when working intarsia, strand both accent colors across the panel, and then twist around a separate ball of the MC to finish working the other side of the front.

Since the front is so complicated, there's no shaping and everything else is straightforward. The back neck is shaped the same as the front for a cute V-neck back. So if you wear a bright tank underneath, you'll have a little neon surprise back there!

jewelrycollage.jpg

I also want to thank two special people that contributed. First is my friend Elisabeth who graciously lent me some of her handmade triangle-themed jewelry (see above) for the photoshoot as the perfect accent. You can see her work at metal & rocks. The other person is Kirsten Hipsky, who created our ebook layout for us and did a fantastic design job. If you buy a copy you'll see what I mean!

Neon Neutral Triangle Club is available on Ravelry as a full 6-pattern ebook for $24, or you can purchase the patterns individually.

Shock Star Slouch KAL

I'm kicking off fall with a fun and free KAL! This is the Shock Star Slouch, knit in Spun Right Round Squish DK in the Shock Star colorway. Want to play along? All you have to do is follow me on Instagram (@emmawelford).

DSC_0254smedit.jpg

I'll be releasing the pattern in parts the week of October 12th on my Instagram. If you prefer a full PDF copy, don't worry--I'll have it on Ravelry for sale after the KAL has ended, but of course the original pattern posts will live on Instagram forever so you can always piece together the parts yourself for free.

All the textures going on in this hat make it perfect for confetti-style or any other hand-dyed yarn with short repeats. I know I have a few of those skeins in my stash...yarns that are too pretty to pass up but tend towards clown barf territory when knit up in regular stockinette. If you want to get your own skein of Shock Star (or another fabulous colorway of Squish DK), you're in luck. Renee is offering a coupon code good for 10% off your purchase from 9/25-10/9. Just use SHOCKSTARKAL10 at her Etsy shop! The hat has two size options and each size uses less than a full skein of the Squish DK.

Look at how much that highlighter yellow pops! And that color is straight-from-the-camera, folks, no crazy Photoshopping needed. This was my first self-shot pattern photoshoot with my Nikon D3200 and it turned out fantastic despite the erm, awkward positions I had to take:

Like Tim Gunn says, "Make it work!" I suppose I need a taller tripod though, unless I want every photo session to also double as a quad-burning workout!

Not on Instagram? You can still follow along online!

Meet the Paglia Baby Blanket

Baby knits are out of my comfort zone. I don't have children myself and the majority of my friends don't have children either, so I'm not exposed to them often. What do they want to wear? Or maybe more important, what do their parents want to dress them in?! A baby blanket though...that I can handle. When my stepsister Beth announced her and her husband Dave's first child last fall, I cooked up plans to design and knit a special baby blanket just for them.

Photos by Lindsey Topham

Photos by Lindsey Topham

The Paglia Baby Blanket might be designed for babies, but I think it still holds true to my design ethos. You start in the center and work outwards, knitting the blanket in the round. The rectangle is split into four wedges. Two are worked in simple garter stitch which adds extra texture and provides a break from the cable-intensive other two panels. The rhythm of the pattern is easily recognizable and it's a small blanket, perfect for a car seat or playtime, so you'll be done with it quickly!

Spud & Chloe Sweater is a machine-washable organic cotton and wool blend, perfect for the intended recipient's California climate. You can use Sweater, or substitute the worsted weight yarn of your choice. Got any upcoming babies in your life?

Playing with Color: Polonaise Cardigan

Welcome to another edition of Playing with Color! Today we'll take a look at the Polonaise Cardigan. Let's just start by saying TGFM--thank god for Malabrigo! Or actually, thank god for Malabrigo's well-designed website that often puts perfect color combinations right next to each other. I mean, check out the page for Silky Merino. Hnnnngggghhh!

Photo by Kate Broderick

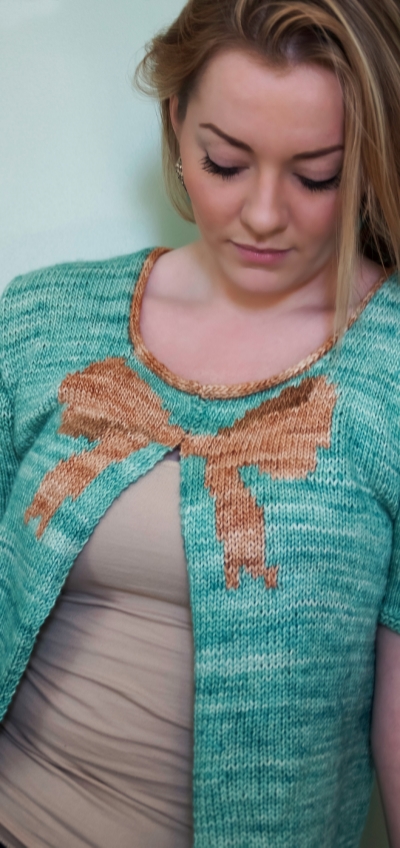
You'll need to pick three colors for this baby: one main color, and two coordinating colors for the bow detail. The idea is to pick two similar shades for the bow, one light and one dark, to be the body of the bow and its shadows. This is another occasion where shopping in-person is SO helpful. Failing that, if you can somehow get your hands on a Malabrigo color card or if you know someone with an extensive Silky Merino stash who can provide input, you'll be much better served than going in blindly and guessing.

I used Spring Water for the MC and Tatami/Topaz for the bow, as I was going for a cloth-of-gold bow look and thought the Spring Water would provide nice contrast. Here are some other fun suggestions! The first color on the left is the body color and the other two would be the bow colors.

Cape Cod Grey, Camote & Coral for a fresh, modern take

Pollen, Raspberry & Jupiter for an unexpected hint of sweetness

Wisteria, Acorn & Redwood Bark for the sophisticate's closet

Do any of these color combinations inspire you?

Playing with Color: Dreamer's Braided Pullover

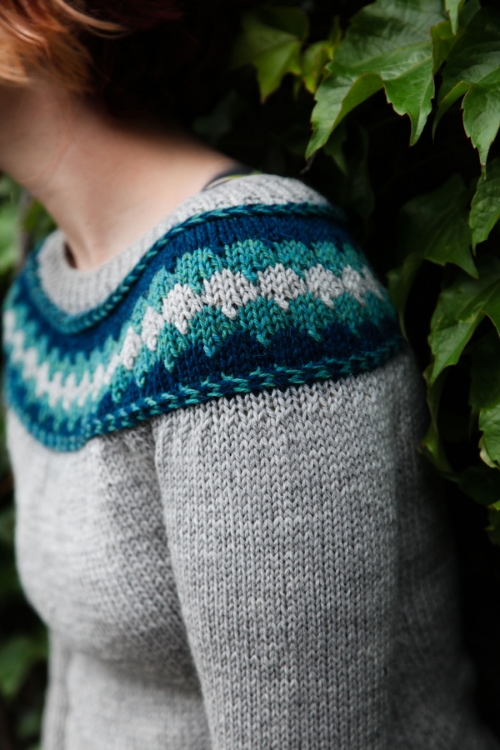
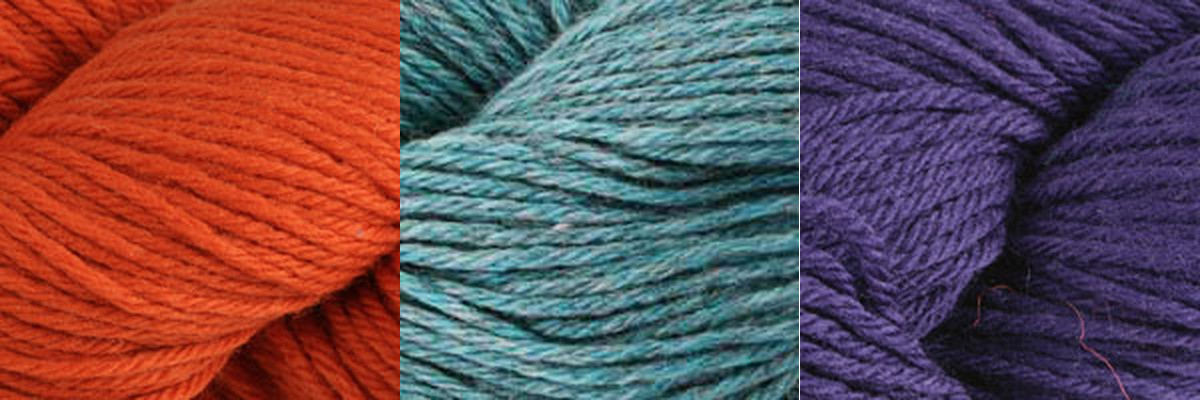
I know I know, it's July and you don't even want to THINK about touching a long-sleeve wool pullover. I'm sorry. (Not really.) You might not be ready to start knitting but why not start playing with color options for your future Dreamer's Braided Pullover? Spend the summer months picking out colors and then begin knitting once fall hits! This design was originally published by Valley Yarns in their Sheffield, which is discontinued, so I was given the rights back to publish it myself and I reknit it in Cascade 220. As such, we already have two color combinations of this sweater floating around. I'm going to focus on options in Cascade 220 since it's such a versatile and affordable yarn. For the sample, I chose a palette of grey and aqua/teal leaning blues.

IMG_6545smallestPhoto by Lindsey Topham

One of my favorite things about 220 is the mix of solids and heathers in the color range. Just like mixing in a warm color with cooler ones adds dimension and visual interest, mixing solids and heathers can really spice up the look of your color palette.

You've got lots of options to tackle color for a sweater like this! In all the pairings shown, the center color is the main body color of the sweater. You can choose either accent color to be used for the corrugated ribbing in the hem and cuffs, though in my sample I used the darker color. Of course, you could always work plain ribbing in the MC and have the colorwork be contained only in the yoke of the sweater. (All photos below from Webs.)

Option 1: Neutral MC, two different pops for the CCs

2425 8013 9341From L to R: 2425 Provence, 8013 Walnut Heather, 9341 Garnet Heather

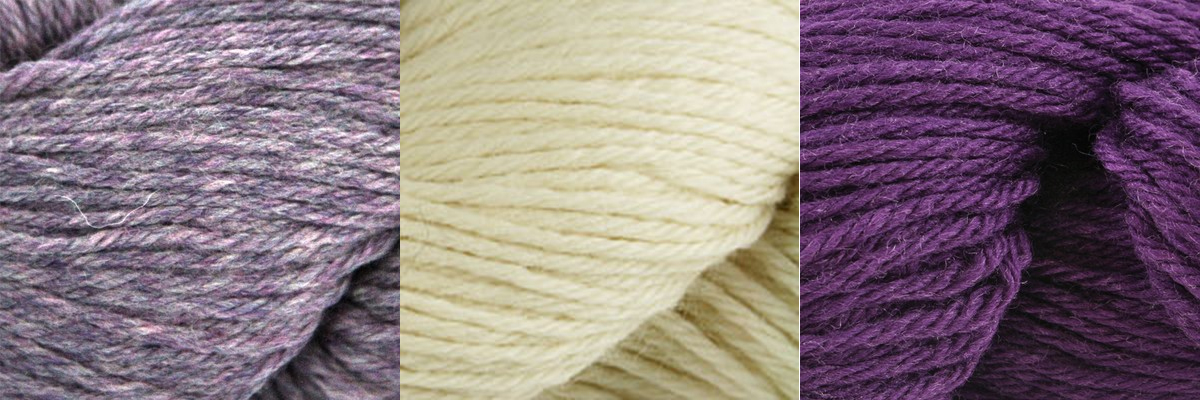
Option 2: Neutral MC, two tonal coordinates for the CCs (same approach as the sample sweater)

9641 8010 7807From L to R: 9641 Purple Tourmaline, 8010 Natural, 7807 Regal

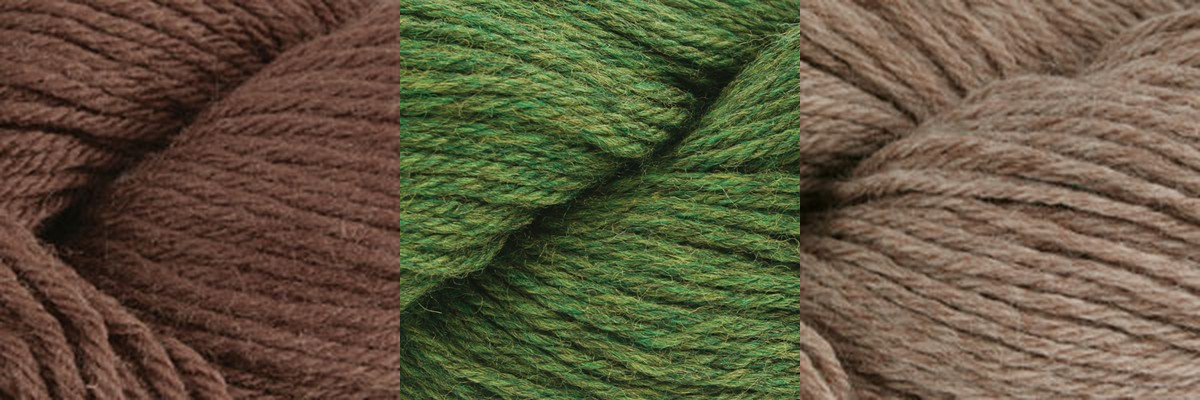
Option 3: Non-neutral MC, two tonal neutrals for the CCs

8686 2429 8012From L to R: 8686 Brown, 2429 Irelande, 8012 Doeskin Heather

For the sake of covering all our bases and bringing these options back to full circle...

Option 4: Non-neutral MC, two different pops for the CCs--this one's for the adventurous!

7824 9452 8886From L to R: 7824 Burnt Orange, 9452 Summer Sky Heather, 8886 Italian Plum

Luckily, there are a ton of colorwork sweater patterns out there, so you can always browse other people's projects on Ravelry and get inspired by their choices! My favorite method is to head to my LYS and start playing with the skeins on the shelves. I always come up with new and unexpected combinations that way and it continually surprises me to see what works together.

Let Them Knit Cake

At the end of April I released Let Them Knit Cake, a Marie Antoinette inspired pattern collection as part of the Malabrigo Freelance Pattern Project!

cover
cover

From the introduction of the ebook:

"Let Them Knit Cake is a pattern collection exploring the intersection of history and fashion viewed through my personal lens as a knitwear designer, a source of inspiration I’ve begun to explore recently. Here I turn my focus to Marie Antoinette, the iconic French queen who is remembered by the public at large for her beauty, glamorous style and perceived superficiality. I’ve interpreted rococo fashion for the modern knitter by examining portraits of Marie in addition to reading accounts of her sartorial choices.

The phrase “let them eat cake” has been falsely attributed to Marie; while an agreed upon fallacy in the academic community, pop culture holds tight to the wrongful association regardless. So as a historian-cum-knitting designer, why not use it as the basis for this collection’s title? I wanted to play upon our familiarity of the phrase and make a reference to the usage of the terms ‘cake’ and ‘frosting’ in the sewing community. ‘Cake’ refers to basic foundation garments in one’s wardrobe (plain tanks, versatile jeans), and ‘frosting’ means fun, maybe frivolous clothing (party dresses, maribou trimmed nighties). The four pieces shown in this collection appear to be frosting on the surface—due in no small part to the saturated and exhilarating colors of Malabrigo Yarn—but I hope that they will take the place of cake in your handknit wardrobe, as essential pieces you wear day after day."

Let's take a closer look at each piece, shall we?

DSC01018
DSC01018

The Polonaise Cardigan, shown in Malabrigo Silky Merino in size 36", is knitted bottom up in one piece starting with a wee lace hem. No shaping in the body, but a small pleat on the upper back (in addition to armhole shaping) helps narrow the silhouette through the bust. I worked the bow with a combination of intarsia and stranded knitting, but you could easily work the whole bow in one color with intarsia, and use duplicate stitch to add the 'shadow' accents instead of stranding that color. After the body is complete, stitches are picked up around the armholes to work short row sleeve caps, and the neckline is finished with an I-cord edging.

DSC00924
DSC00924

The Coronation Tank, shown in Malabrigo Arroyo in size 34", is also worked from the bottom up in one piece. Large cables gradually shift from the center of the tank to the outer edges following princess seam lines as the stockinette center of the front expands. Waist shaping takes place on the back of the tank creating subtle corset lines, and a smaller cable detail decorates the chest. I love the versatility of tanks that can be layered as vests in the fall and winter, which is why I showed it here over a blouse.

DSC01067
DSC01067

The Fargeon Mitts, shown in Malabrigo Silky Merino in size S, are quick mitts that you can easily make using the leftovers from your Polonaise Cardigan. Knit from the bottom edge up, they feature a ruffled edging that transitions into a wide ribbed pattern and a thumb gusset.

DSC01097
DSC01097

The Dauphine's Stockings, shown in Malabrigo Sock in size M, are knit toe-up with a short row heel. The lace pattern on the tops of the feet continues up the shin and repeats on the back of the leg, but grows to accommodate leaf motifs for the calf shaping.

Since the goal of the collection was to do 'modern Marie Antoinette' and not 'recreation-level authentic costumes' I made sure to style them with modern clothing, though with a few nods to the original inspiration. Those shoes, for example--exactly what I had in mind and I nabbed them at the Salvation Army! What do you think? Would you be able to work these pieces into your current style?

You can find the patterns on Ravelry by following the links throughout this post. The Polonaise Cardigan and Coronation Tank are available for $7 each, the Fargeon Mitts and The Dauphine's Stockings for $5 each, and the ebook is available for $18.

Momo's Amazing Modifications

Momo is a fantastic knitter with a droolworthy project page on Ravelry. She tackles difficult colorwork projects quickly with ease, has great color sense and almost always uses fabulous hand-dyed yarn. I was beyond thrilled to see how she creatively translated the charts from Elektrocute into a full pullover!

16690603128_a0ceb06268_zAll photos by Momo

In addition to expanding the charts to fit the length of the sweater, Momo made the background a gradient progression of grays which I think would look great in the cowl too! According to her project page notes, the pullover is top-down, uses the contiguous sleeve method and the zipper facing is steeked.

16878199865_62b5ca3704_zSuper creative--thank you for letting me share this, Momo!

If you love a colorwork chart but don't like the item it's intended for, why not modify? A cowl chart can be turned into a full sweater, a mitten motif can become the motif of a circular yoke cardigan, or a full sweater chart can be scaled down to a hat if you are dipping your toes into stranded knitting and want to test out a smaller project first. Knitting is full of limitless possibilities if you are open to making modifications and coming up with creative solutions to get the projects you want. Go forth and modify!

Playing with Color: Stripe Quartet

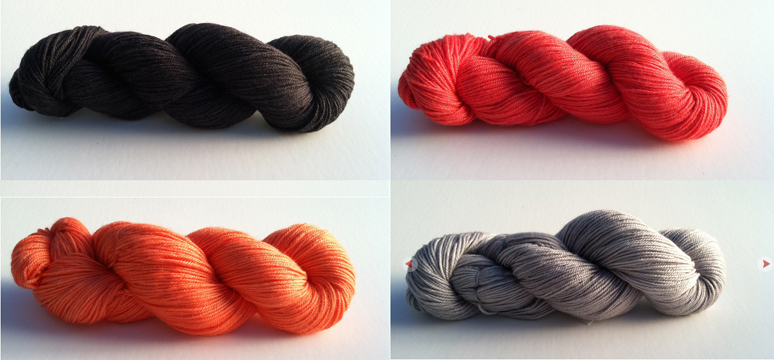
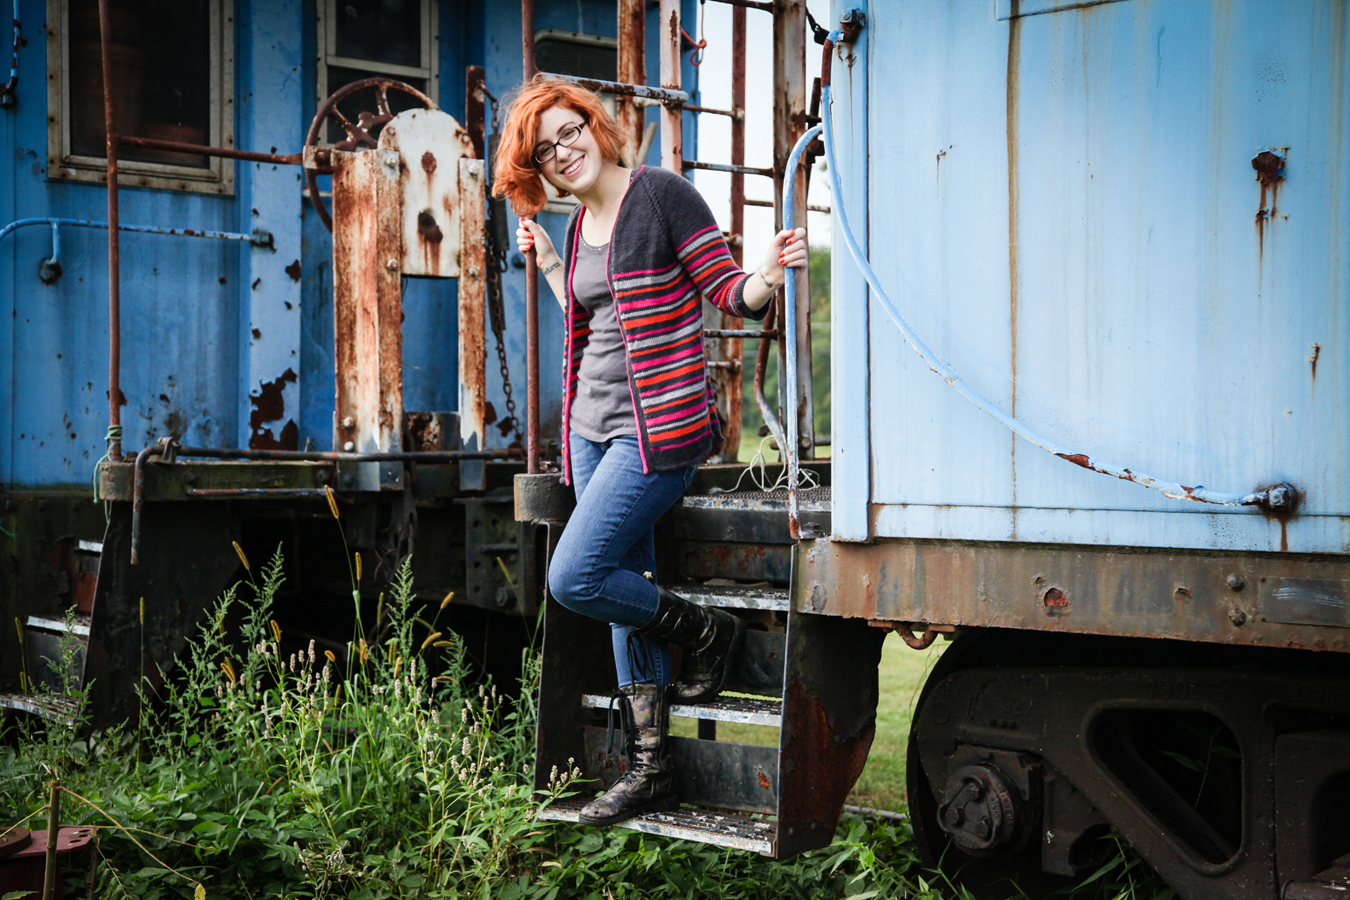
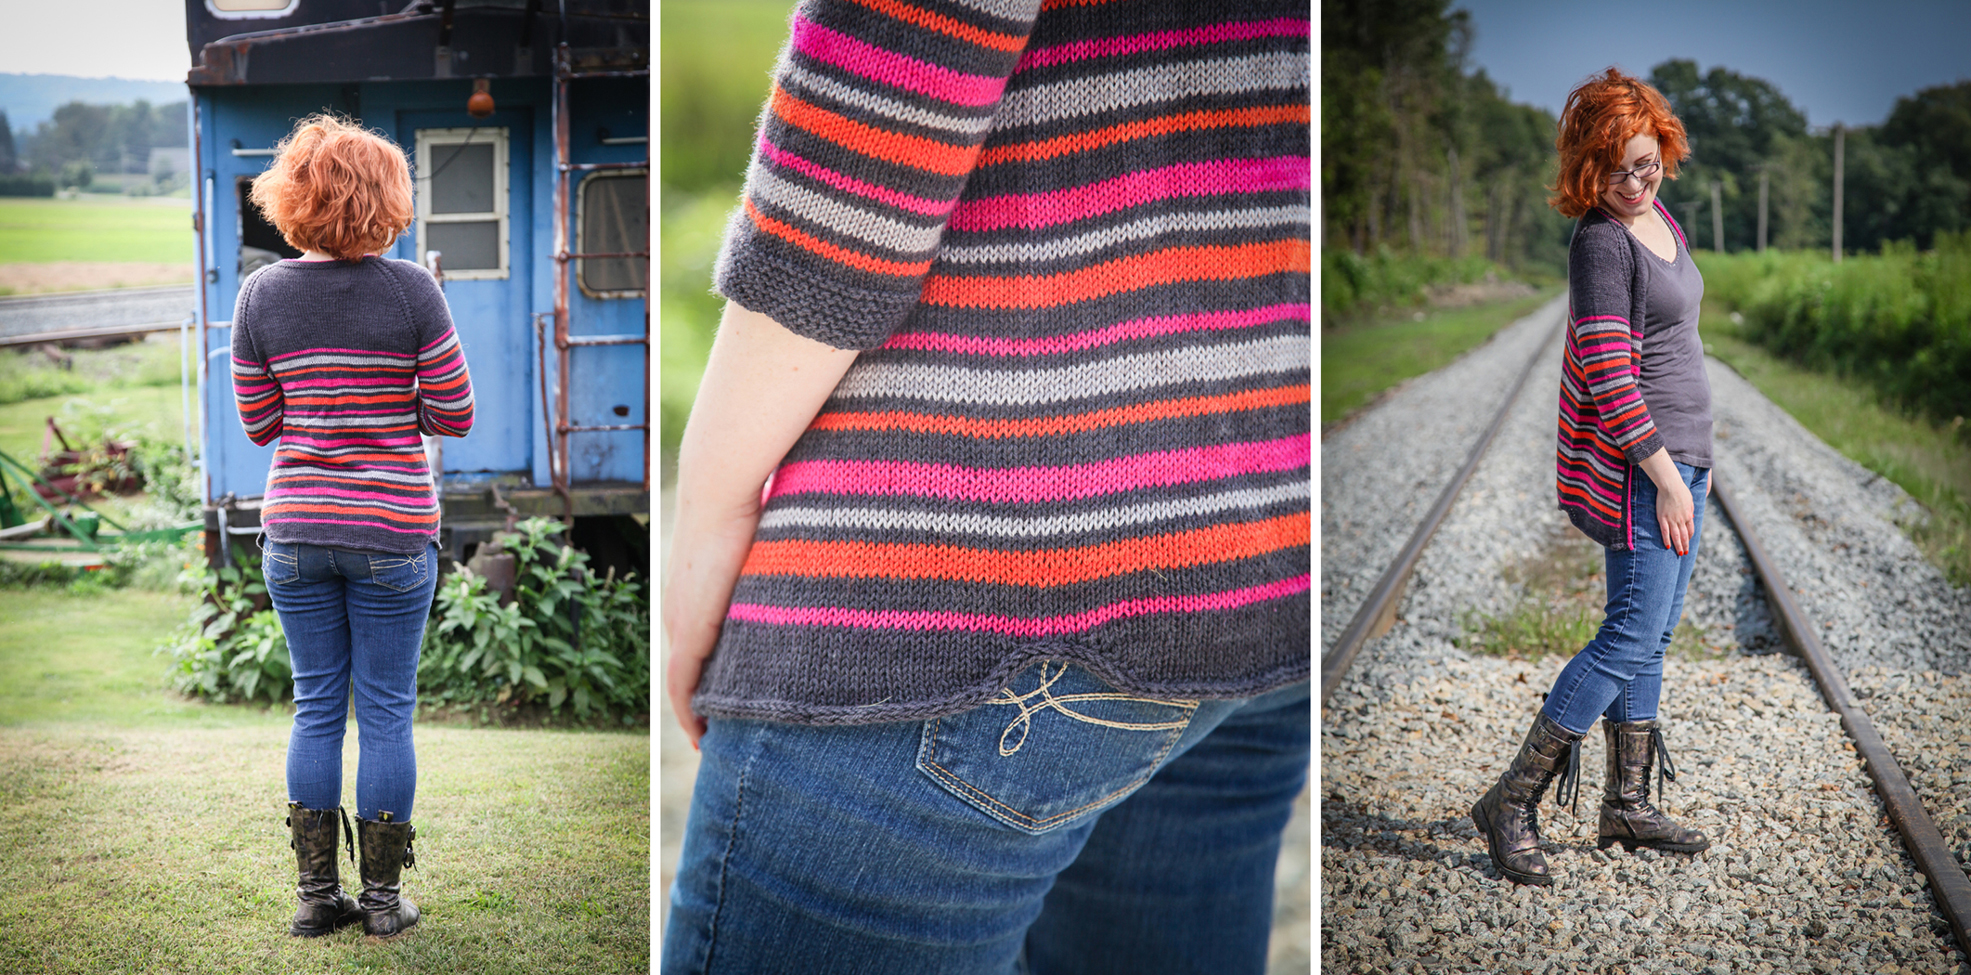
Let's dive into another color-driven design, shall we? Stripe Quartet is a great simple, stripey cardigan using Baah Aspen. Mira (of Baah) and I picked out the colors together at TNNA last May and it was wonderful that we had similar thoughts. I'm super pumped she let me throw that orange in there because I love orange! There are two ways to approach a project like this, in my opinion. First is to use two neutrals and two color pops, which is what I did with my sample using two greys, hot pink and orange. There aren't many neutrals currently in the Aspen color line, so let's pick out a few different color pops that could be subbed in using the same greys as I did, Shadow and Grey Onyx.

coralreef sirenaClockwise: Shadow, Coral Reef, Grey Onyx, Sirena

I'm really digging that Coral Reef color! But how does it look with other 'pop' colors?

coralreef pecheClockwise: Shadow, Coral Reef, Grey Onyx, Peche

coralreef fuchsiaClockwise: Shadow, Coral Reef, Grey Onyx, Fuchsia

Sirena and Fuchsia are the more startling/weird color combinations with the Coral Reef but come on, I like weird! If you're going to do a four-color striped sweater I say have fun with it and go outside your comfort zone. :) Peche and Coral Reef is a tonal, more muted version of the original sample. Each of these combinations has a mix of warm and cool colors, which I think is important to consider when knitting multi-color designs. (Shadow, Grey Onyx and Sirena: Cool; Coral Reef and Peche: Warm; Fuchsia: Debateable.)

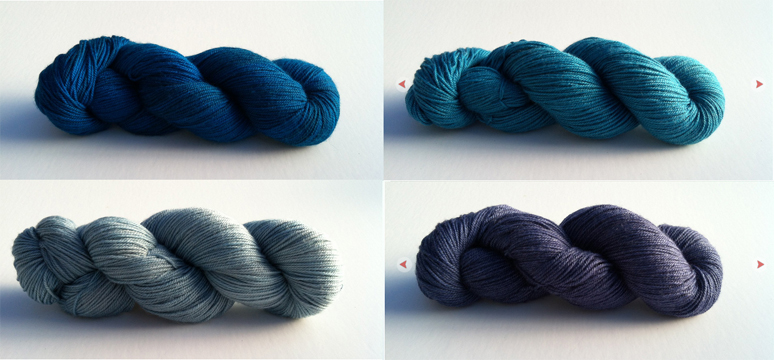
Another way to approach this project is by picking 4 shades in the same color family for a more gradient effect with less contrast. This option is dependent on your yarn of choice having lots of colors in the color family of your choice, and Aspen is somewhat limited here--you can't do an all-yellow Stripe Quartet, but not many dyers offer a multitude of yellows anyway!

bluetopaz sirena navy skyClockwise: Blue Topaz, Sirena, Navy, Sky

These four blues create a balanced pairing since the top row features warmer blues with turquoise/teal influences and the bottom two colors are straight blues, almost a little greyed out. A great example of warm/cool mix while staying in one color family.

amethyst fuchsia aubergine violetClockwise: Amethyst, Fuchsia, Aubergine, Violet

Another beautiful and subtle palette that combines warm and cool purples of all hues!

Which way do you prefer your stripes--funky and off-beat or tonally united?

Cats Cats Cats

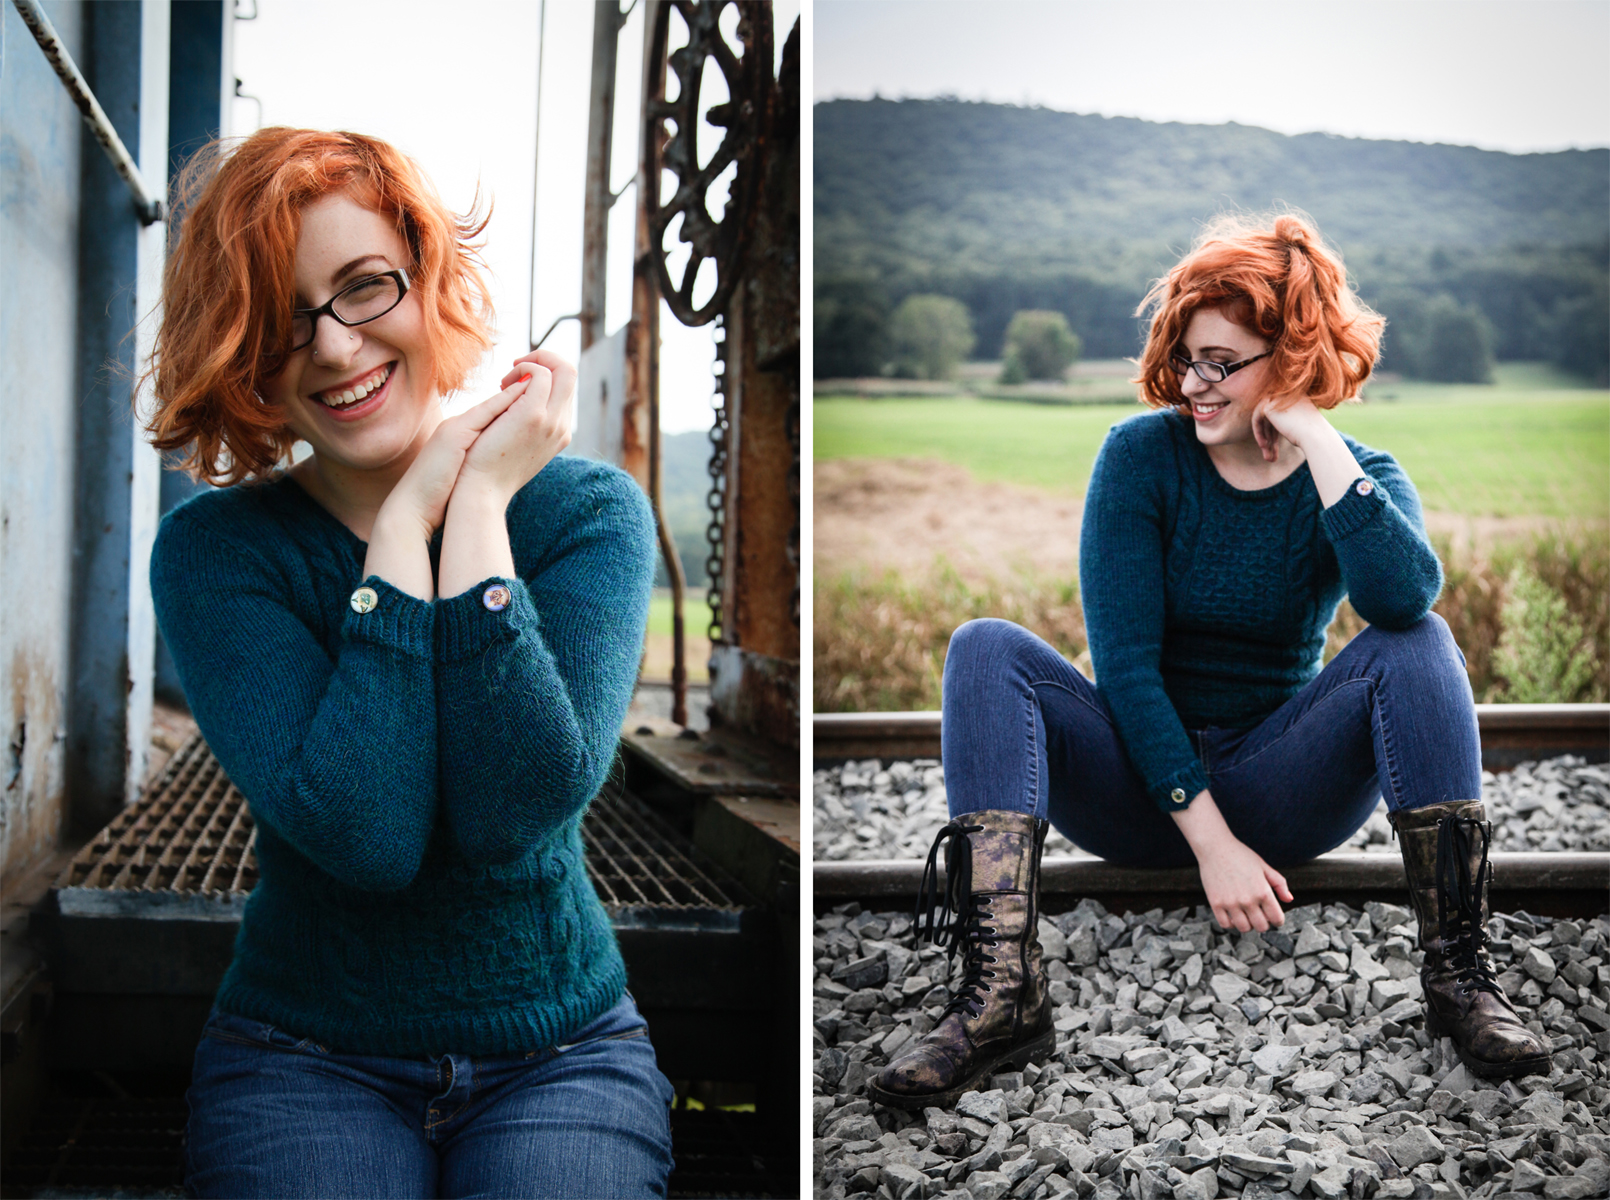
As promised, the second sweater from the caboose photo shoot: Cables 'n Cats!

IMG_1215 (2)smPhotos by Lindsey Topham

This sweater has no particular inspiration, which is how I work sometimes. I was playing around with juxtaposing various cable and texture patterns together and fell upon this combination which I really liked. It's a classic, simple shape overall but very flattering thanks to the waist shaping and the large cables which sit at a princess seam orientation. And then you turn around to reveal....cat buttons!

IMG_1353smestThe sleeve cuffs are also buttoned and each button features a different kitty! I love this style of buttons--I used them in my Brooklyn Bridge Mitts, and I have robot buttons in my stash waiting for the perfect sweater.

blogThe construction is a little interesting towards the end, but nothing crazy complicated. The body is worked in the round until the armholes, then the sleeves are worked separately (also in the round) and joined together with the body to work the yoke in one piece....at first! Once stitches are bound off at the center back for the button placket, the yoke is worked back and forth in rows. Then as the neckline shaping begins, you work back and forth on one side of the body at a time (going from the front neck across the shoulder to the center back.)

You can snag Cables 'n Cats on Ravelry now for $7.00.

Let's Get Stripey

I recently released a new cardigan pattern....and never posted about it here. Oops! In case you missed it on Ravelry, this is Stripe Quartet!

IMG_1598smallestAll photos by Lindsey Topham

Knit in four colors of the gorgeous Baah Aspen, Stripe Quartet is a top-down raglan cardigan that lets the stripes take center stage. There are a few special touches, like eyelet raglan increases and a curved hem finished with an I-cord bind off.

blog

I was super excited to finally use this location! I am constantly making note of potential photoshoot locations and I had mentally bookmarked this one ages ago. These amazing blue cabooses reside just behind Green Valley Produce, a farm stand in Deerfield, MA. The owner Jon was nice enough to allow us to shoot there and I have another sweater coming soon that we took photos of here as well.

I'm a huge fan of orange and pairing it with hot pink and greys was a dream color palette for me. What quartet of colors would you get stripey with?

Free Pattern: Rainbow Slip Mitts

smilehI have a free pattern for you today! These were inspired by some work I'm doing with my friend Gail, The Kangaroo Dyer. She put together these colorful mini skeins in her Poet Seat Fingering base--she calls it her 'first aid kit' for color--and gave me a batch to play with. I decided to put them to good use in this super easy pair of handwarmers! They are worked flat and seamed partially up the side to create an opening for the thumb. Rainbow Slip Mitts

Finished Size: 7" around, 4.75" long (17.80cm x 12cm)

Yarn: approx 50 yards of natural and scrap amounts of 5 colors. I used RainCityKnits MCN Fingering in Natural, and a Kangaroo Dyer Poet Seat Fingering Mini Skein Kit. This is a great way to use up precious leftovers!

Materials: US 3 (3.25mm) needle, tapestry needle

Gauge: 30 sts by 38 rows = 4" (10cm) in rainbow slip pattern. Gauge is not crucial for this project.

Using natural, CO 49 sts leaving a long tail to seam with at the end. Row 1 (RS): Slip 1, *p1, k1; rep from * to end. Row 2 (WS): Slip 1, *k1, p1; rep from * to end. Repeat these 2 rows until work measures 1.5" from beginning. Knit 1 row, then purl 1 row. Begin rainbow slip pattern.

Switch to pink (or your first color). Row 1 (RS): K1, *slip 1, k1; rep from * to end. Row 2: Repeat the last row. Row 3: Knit. Row 4: Purl.

Switch to orange (or your next color). Row 5: K2, slip 1, *k1, slip 1; rep from * until 2 sts remain, k2. Row 6: P1, k1, *slip 1, k1; rep from * until 1 st remains, p1. Row 7: Knit. Row 8: Purl.

Switch to yellow. Row 9: K1, *slip 1, k1; rep from * to end. Row 10: Repeat the last row. Row 11: Knit. Row 12: Purl.

Switch to green. Row 13: K2, slip 1, *k1, slip 1; rep from * until 2 sts remain, k2. Row 14: P1, k1, *slip 1, k1; rep from * until 1 st remains, p1. Row 15: Knit. Row 16: Purl.

Switch to indigo. Row 17: K1, *slip 1, k1; rep from * to end. Row 18: Repeat the last row. Row 19: Knit. Row 20: Purl.

Switch to pink. Row 21: K2, slip 1, *k1, slip 1; rep from * until 2 sts remain, k2. Row 22: P1, k1, *slip 1, k1; rep from * until 1 st remains, p1. Row 23: Knit. Row 24: Purl.

Switch to orange. Row 25: K1, *slip 1, k1; rep from * to end. Row 26: Repeat the last row. Row 27: Knit. Row 28: Purl.

Switch to yellow. Row 29: K2, slip 1, *k1, slip 1; rep from * until 2 sts remain, k2. Row 30: P1, k1, *slip 1, k1; rep from * until 1 st remains, p1. Row 31: Knit. Row 32: Purl.

Switch to green. Row 33: K1, *slip 1, k1; rep from * to end. Row 34: Repeat the last row. Row 35: Knit. Row 36: Purl.

Switch to indigo. Row 37: K2, slip 1, *k1, slip 1; rep from * until 2 sts remain, k2. Row 38: P1, k1, *slip 1, k1; rep from * until 1 st remains, p1. Row 39: Knit. Row 40: Purl.

Switch back to natural. Knit one row. Row 1 (WS): Slip 1, *k1, p1; rep from * to end. Row 2 (RS): Slip 1, *p1, k1; rep from * to end. Repeat these two rows once more, then work 1 more WS row. On next RS row, BO all sts in pattern and leave a long tail to seam with.

Weave in ends. Using your tail from casting on, seam the bottom of the mitt 2" up the side. Use the tail from your BO to seam the top of the mitt 1" down the side. This will leave a 1.75" opening along the side for your thumb, but adjust the length and placement of side seams as needed to comfortably fit your hand. Repeat for the second mitt (they are identical.)

IMG_1776 editedHappy slip knitting!

Adventures in Wonderland

IMG_5376smAll photos in this post by Lindsey Topham unless stated otherwise

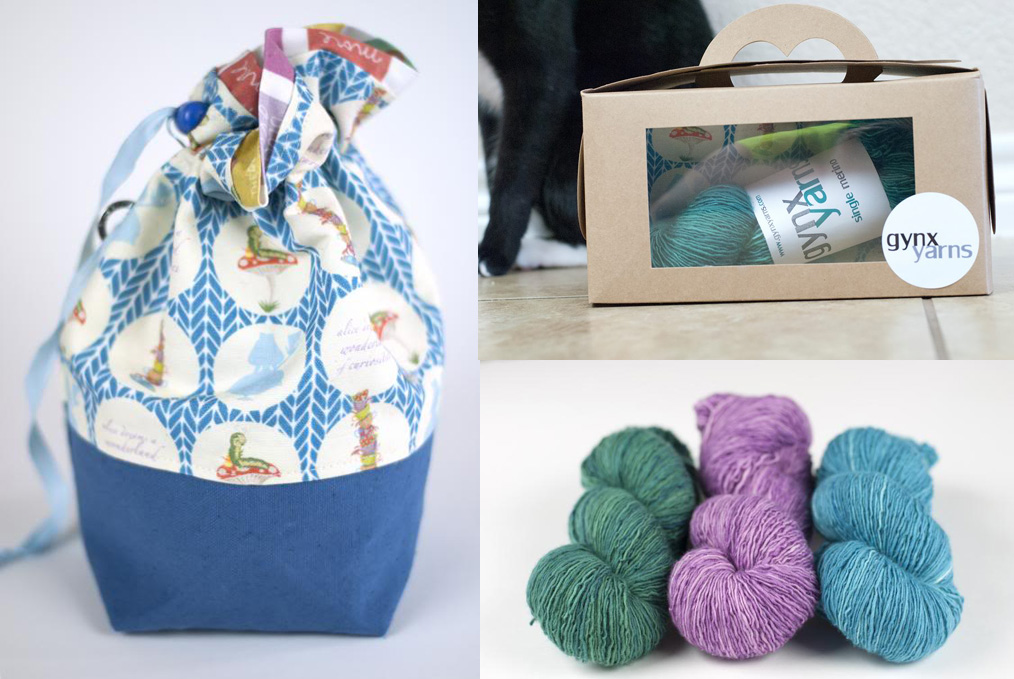
I've once again teamed up with Gynx Yarns to bring you an amazing accessory collaboration! Meet Advice From a Caterpillar, my contribution to Laura's Alice in Wonderland themed kit she is debuting at SSK this month.
Laura contacted me asking if I could whip up a one or two skein accessory design to fit her planned theme and of course I had to say yes. She is always a joy to work with--not only is the yarn beautiful, but she trusts me as a designer and lets my imagination run wild. Laura dyed up three exclusive Wonderland inspired colorways just for the kits (my shawl uses 'Wonderland') and asked Little Skein in the Big Wool to contribute a matching project bag. Take a look!

kit collagePhotos by Gynx Yarns - yarn colors from L to R are Wonderland, Cheshire Cat & Caterpillar

I happen to have one of those project bags myself (advance perks y'all!) and the construction is FABULOUS. Really sturdy and the fabric is adorable.

In case you couldn't guess it from the name, my shawlette drew inspiration from the Caterpillar. I have to admit, I am a bigger fan of Through the Looking Glass but I wanted to go with the original book for this one. I was imagining the cables as wriggly caterpillars at first, then I realized the cables' transition to ribbing and back again was an apt metaphor for metamorphosis. Caterpillar to butterfly, Alice to Big and Little Versions of Herself, and so on. Pretend you're an art student and fill in with your long-reaching explanation of choice.

blog collageAs luck would have it, this turned out to be the most perfect photoshoot yet! Lighting, location, styling--everything was on point to create a magical mood.

If you're not attending SSK, look for kits/preorders to appear in the Gynx Etsy Shop around July 22nd. I'll make an announcement when the pattern is available for individual sale. Til then, beware of the Jabberwocky, eh?

It's Electric!

*cue The Electric Slide and memories of dancing to it in middle-school gym class* Ahem! Now that little bit of reminiscing is out of the way, I bring you: Elektrocute!

IMG_7337smAll photos by Lindsey Topham

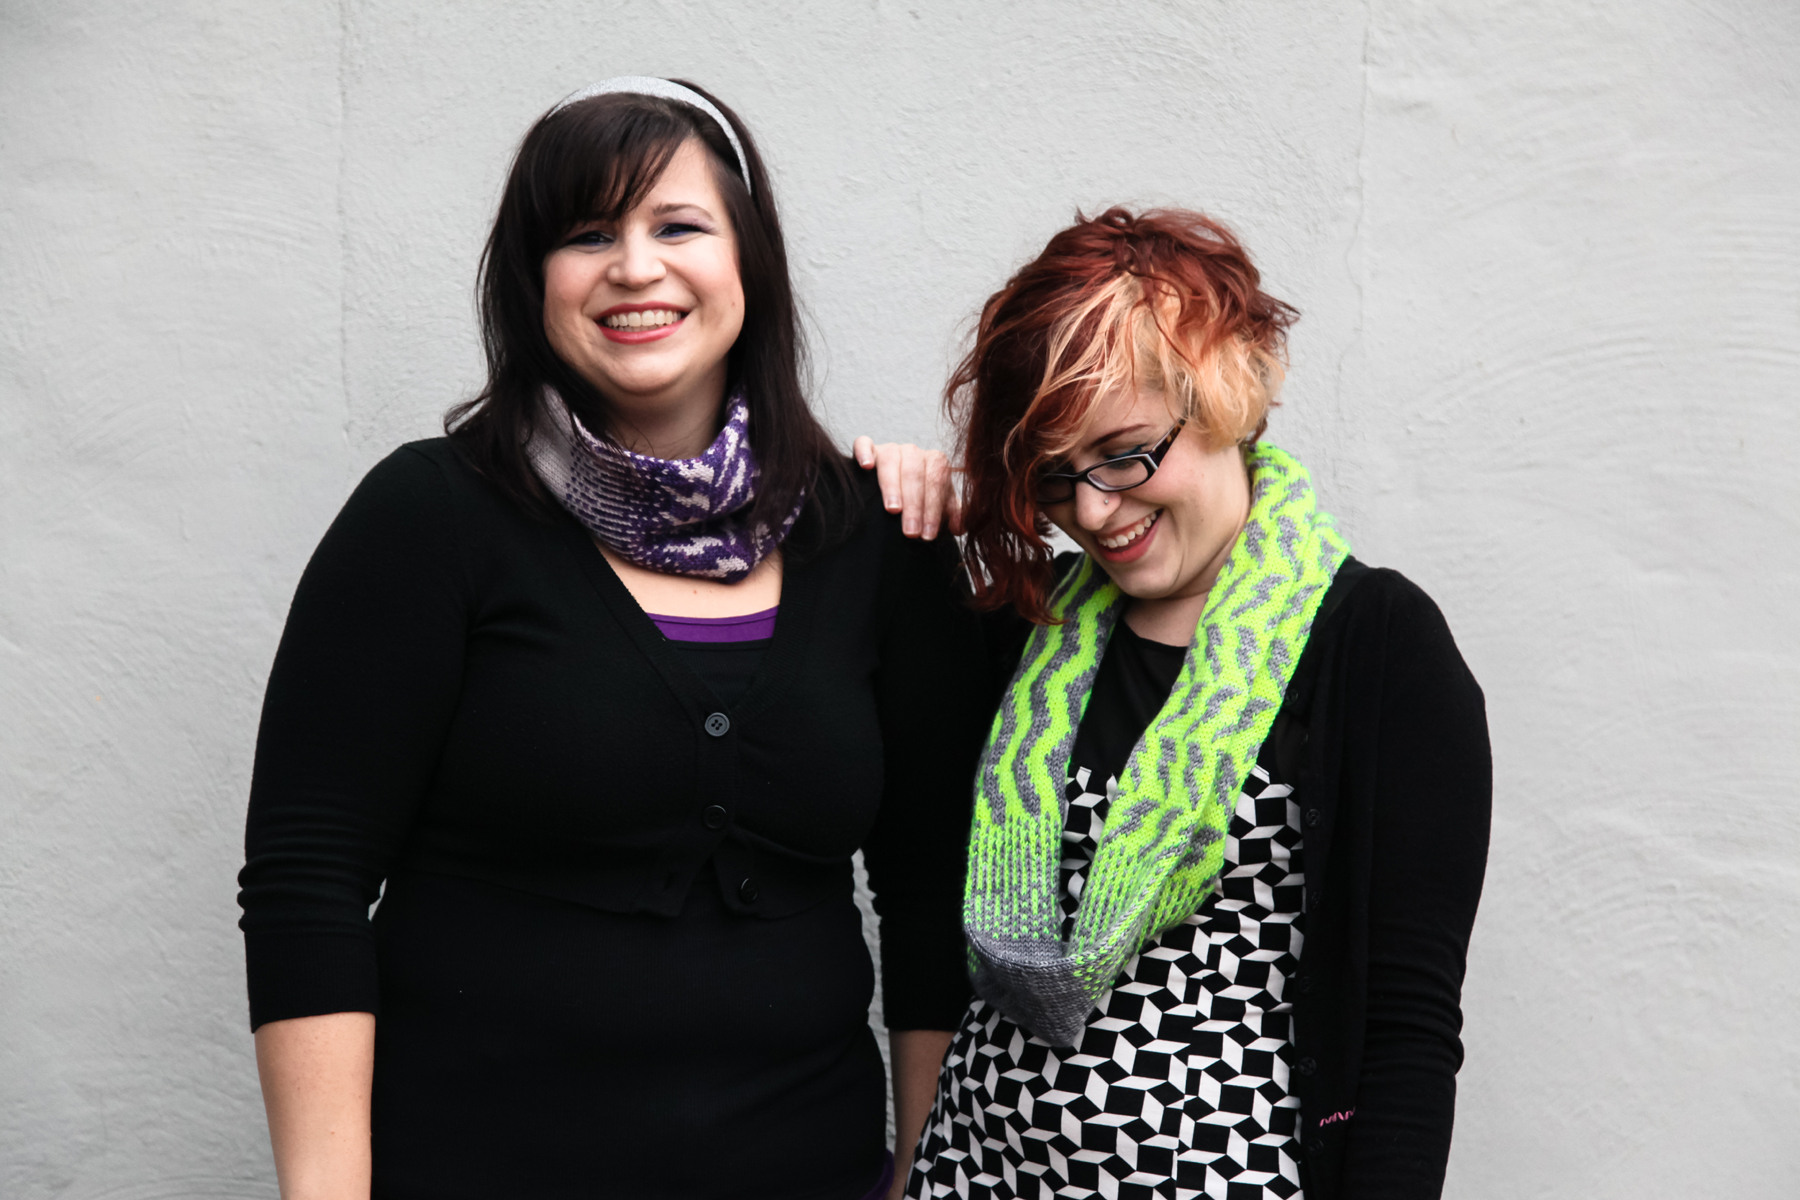
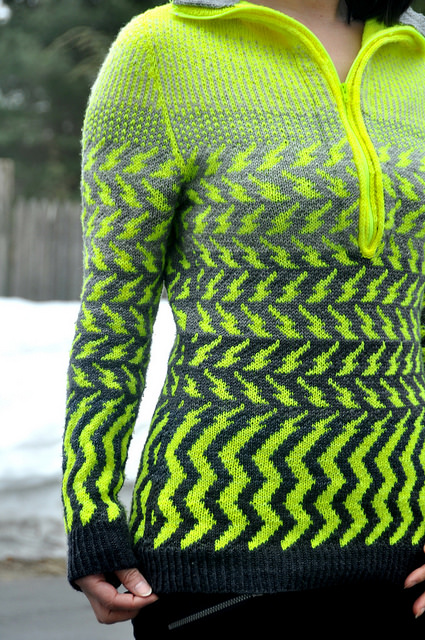
Elektrocute is a graphic two-color cowl featuring a whole mess o' patterns! See: gradient transitions, zig-zags, and the cutest widdle lightening bolts ever. You won't get bored knitting or wearing this one, and it's sure to make you stand out from the crowd.

blogI'm sporting the longer 44" length (which can be worn open or doubled over) while Mary rocks the close-fitting 28" length. Both sizes take less than 2 skeins (one of each color) of Madelinetosh Pashmina. I've had Pashmina in my stash for over a year now but this is my first time using it--for shame! I can't think of a better luxury than treating yourself to this deliciously scrumptious yarn and then wrapping it around your neck. Not to mention the endless color combinations...

I wanted to try something a little different for this photo shoot, which is how we wound up with shots like this:

IMG_7294smI always enjoy starting my day with picking leaves out of my hair before work, don't you?

You can snag Elektrocute on Ravelry now.

Pantonal II: Canephora

If you hate feet, look away quick!

IMG_4406smallestAs always, photos by Topham Photo

Meet Canephora, the second installment of the Pantonal club collaboration between myself and Gynx Yarns! This is my first ever sock design because trying new things is fun, right? So this experience was a mix of that "wow this is way easier than I thought it would be" feeling and the "wait this is TOO easy am I forgetting something important?!" sense of panic. Aside from a few minor snafus, these babies went pretty smoothly and I'm thankful for that.

blog

The name continues in my theme for this project--the Pantone color is Carafe, Laura's version is called Cafe, and canephora comes from the Latin name for Robusta coffee, Coffea canephora. I'm not a big coffee drinker, since I try to avoid unnecessary sugar whenever I can and I'm too much of a pansy to drink my coffee black! So this is my dose of toasty coffee-brown goodness.

Available to non-subscribers on May 1st.

Pantonal I: Lecanora

Photos thanks to Topham Photo

The first installment of Pantonal, my club collaboration with Gynx Yarns, is now out! Yarn has been shipped, PDFs have been emailed, and I can't wait to see Lecanora on the needles of club subscribers.

I'm supremely happy with this lovely lace stole. While I've designed patterns with lace touches before, this is my first all-out lace attempt--charted and everything!--and it worked out fabulously. I love how the lace patterns flow into each other and get progressively lighter and more ephemeral as you work from the center outwards.

I decided to be a little theme-y with this club and based the pattern names off the color names. This color is Lichen, and Laura created a gorgeous and interesting mix of green and grey with hints of reddish flecks. Lecanora is a genus of lichen...you get the idea!

Itching to get your hands on the pattern? If you're not a club subscriber, you'll have to wait until April 1st.