Different Kind of DIY: Garage Gym Makeover

In June, Mark and I undertook the massive task of converting our not-a-real-garage into a garage gym!

beforeBefore: outside and in

"Not-a-real-garage" because it had no door and that opening isn't large enough to fit a car into, so it mostly became the repository for random stuff. (Obviously these before pictures are after it was cleaned out of junk.) We rent, and this structure was already here and wired, which was great because we didn't have to mess with that--only needed to get our landlord's permission!

The first step was to prep for a poured concrete floor. Since Mark has a contractor's license and this was his baby, he did most of the labor though I helped out when I could. It was his first time working with concrete but luckily, his father used to work as a mason so in addition to watching lots of This Old House videos, we had an expert who advised us on the prep and then helped out the day of the pour. Super win! We rented a plate compactor for the day to tamp down the dirt floor in preparation, and to press down some gravel that we used to level out the floor. Somehow we managed to fit it into the backseat of my Honda Civic--the rental guy was very impressed with that trick. Then Mark laid down the concrete mesh, which is just thick wire mesh that covers the floor to make the concrete stronger. (I was able to help a little with this part, ha.) Seeing as we had an opening in our structure and weren't pouring a closed off foundation, we had to place boards across the opening and shore them up with little props so the concrete wouldn't spill out on to the lawn.

We contracted a local company to deliver the concrete on a Saturday morning and the truck was HUGE! It's one thing to pass one on the highway and quite another to see one dominating your driveway:
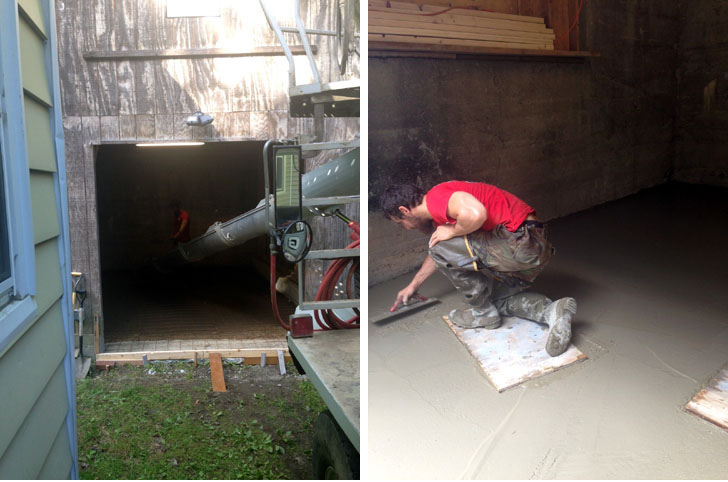
duringDuring: concrete delivery and Mark hand float finishing the surface

Once the concrete is poured and spread to all the areas you are covering, it comes time to float the surface! Floating=making the top nice and smooth, leveling and filling in any gaps, basically creating the look of the finished floor. (The concrete delivery guy had left by this point, they don't help with anything past dumping the concrete.) We rented a bull float, which kind of looks like a large metal Swiffer without a pad on it, LOL, but it was in poor condition and was messing up the surface rather than smoothing it. Mark's dad to the rescue! He showed us how you can finish it entirely by hand, using boards to kneel on to avoid sinking into the concrete, though we did have to wait a little bit after it was poured for the concrete to reach this stage to make the support possible. You can't wait too long to float the surface or the concrete becomes unworkable and the 'cream' (the moisture that rises to the top when you float it) is no longer present, and that's needed to smooth things over. Professional concrete contractors have power float machines which can get that super smooth and shiny finish seen in stores, but we weren't about to get into that so our floor isn't perfectly smooth (though entirely useable). Mark and I also put our handprints into one corner before the concrete dried :)

After the floor had cured for a few days, Mark began framing the opening so we could put in a door.
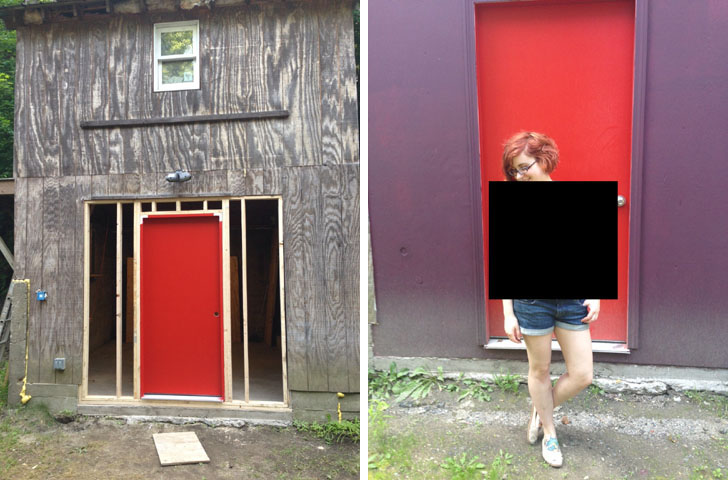
afterDuring/after: framing and the final outside (I'm wearing an unpublished sweater design, hence the censorship!)

We painted our door red because, why not? The wall we built to close the opening is painted brown, but it pulls more purple in some light which is why it looks purpe-ly above. Currently the rest of the structure is unpainted, though we'd like to paint the rest of it someday and add gutters, if we can come to an agreement with our landlord to reduce rent in exchange for those labors.

So what's inside?

photo 4After: the finished inside!

All the workout goodies! We have:

  • power rack with T-bar row attachment, on the lifting platform Mark built
  • Olympic bar and 500 lbs of plates (that's including the bar's weight)
  • adjustable weight bench
  • two mirrors
  • ballet barre for stretching
  • heavy bag
  • full set of dumbbells and 2 kettlebells, ab wheel, wrist/ankle weights
  • exercise ball, pull-up bands and resistance bands
  • yoga mats and blocks
  • two pull-up bars (one is part of the rack, the other is separate)
  • gymnast rings

It's incredible to have this at our disposal 24/7, only a few feet from our house. Mark lifts almost daily, since he's currently following 5/3/1 (a powerlifting program). I use the gym more sporadically because I'm attending fabric and pole classes every week, but it's great to have the freedom to pop in when I want a quick workout or have the urge to try something new. Currently my favorite use of it is to do some short lifting sets, either squats or deadlifts, and then do pull-ups and aerial conditioning on the rings. I like to invert on them and cycle through different positions (split, pencil, pike) and lower myself down really slow. My goal is to be able to do skin the cat!

If you're local and want to workout with us...let's do it!

Balance

balance and progressFinally nailing my shoulder mount (left); handstand progressions & improving form (right)

So far, the best thing about my new gig is that I have time to enjoy being me. That includes extra pole sessions, late night Fallout 3 marathons, and the luxury of spending an afternoon reading--something I haven't done in years because of the guilt of not constantly forcing myself to be productive, to do something 'worthwhile.'

When I imagined my new life I thought I would be ten times more productive, because I assumed I would spend all my spare time knitting and doing the myriad assortment of related designer tasks (as I had done previously in every spare moment I had outside of work). More spare time=more work, right? Instead, I'm taking time to live...and my designing isn't suffering.

This is your regularly scheduled reminder to strive for balance. I'm a couple years late to the message though!

Free Pattern: Rainbow Slip Mitts

smilehI have a free pattern for you today! These were inspired by some work I'm doing with my friend Gail, The Kangaroo Dyer. She put together these colorful mini skeins in her Poet Seat Fingering base--she calls it her 'first aid kit' for color--and gave me a batch to play with. I decided to put them to good use in this super easy pair of handwarmers! They are worked flat and seamed partially up the side to create an opening for the thumb. Rainbow Slip Mitts

Finished Size: 7" around, 4.75" long (17.80cm x 12cm)

Yarn: approx 50 yards of natural and scrap amounts of 5 colors. I used RainCityKnits MCN Fingering in Natural, and a Kangaroo Dyer Poet Seat Fingering Mini Skein Kit. This is a great way to use up precious leftovers!

Materials: US 3 (3.25mm) needle, tapestry needle

Gauge: 30 sts by 38 rows = 4" (10cm) in rainbow slip pattern. Gauge is not crucial for this project.

Using natural, CO 49 sts leaving a long tail to seam with at the end. Row 1 (RS): Slip 1, *p1, k1; rep from * to end. Row 2 (WS): Slip 1, *k1, p1; rep from * to end. Repeat these 2 rows until work measures 1.5" from beginning. Knit 1 row, then purl 1 row. Begin rainbow slip pattern.

Switch to pink (or your first color). Row 1 (RS): K1, *slip 1, k1; rep from * to end. Row 2: Repeat the last row. Row 3: Knit. Row 4: Purl.

Switch to orange (or your next color). Row 5: K2, slip 1, *k1, slip 1; rep from * until 2 sts remain, k2. Row 6: P1, k1, *slip 1, k1; rep from * until 1 st remains, p1. Row 7: Knit. Row 8: Purl.

Switch to yellow. Row 9: K1, *slip 1, k1; rep from * to end. Row 10: Repeat the last row. Row 11: Knit. Row 12: Purl.

Switch to green. Row 13: K2, slip 1, *k1, slip 1; rep from * until 2 sts remain, k2. Row 14: P1, k1, *slip 1, k1; rep from * until 1 st remains, p1. Row 15: Knit. Row 16: Purl.

Switch to indigo. Row 17: K1, *slip 1, k1; rep from * to end. Row 18: Repeat the last row. Row 19: Knit. Row 20: Purl.

Switch to pink. Row 21: K2, slip 1, *k1, slip 1; rep from * until 2 sts remain, k2. Row 22: P1, k1, *slip 1, k1; rep from * until 1 st remains, p1. Row 23: Knit. Row 24: Purl.

Switch to orange. Row 25: K1, *slip 1, k1; rep from * to end. Row 26: Repeat the last row. Row 27: Knit. Row 28: Purl.

Switch to yellow. Row 29: K2, slip 1, *k1, slip 1; rep from * until 2 sts remain, k2. Row 30: P1, k1, *slip 1, k1; rep from * until 1 st remains, p1. Row 31: Knit. Row 32: Purl.

Switch to green. Row 33: K1, *slip 1, k1; rep from * to end. Row 34: Repeat the last row. Row 35: Knit. Row 36: Purl.

Switch to indigo. Row 37: K2, slip 1, *k1, slip 1; rep from * until 2 sts remain, k2. Row 38: P1, k1, *slip 1, k1; rep from * until 1 st remains, p1. Row 39: Knit. Row 40: Purl.

Switch back to natural. Knit one row. Row 1 (WS): Slip 1, *k1, p1; rep from * to end. Row 2 (RS): Slip 1, *p1, k1; rep from * to end. Repeat these two rows once more, then work 1 more WS row. On next RS row, BO all sts in pattern and leave a long tail to seam with.

Weave in ends. Using your tail from casting on, seam the bottom of the mitt 2" up the side. Use the tail from your BO to seam the top of the mitt 1" down the side. This will leave a 1.75" opening along the side for your thumb, but adjust the length and placement of side seams as needed to comfortably fit your hand. Repeat for the second mitt (they are identical.)

IMG_1776 editedHappy slip knitting!

My Finished OAL Dress

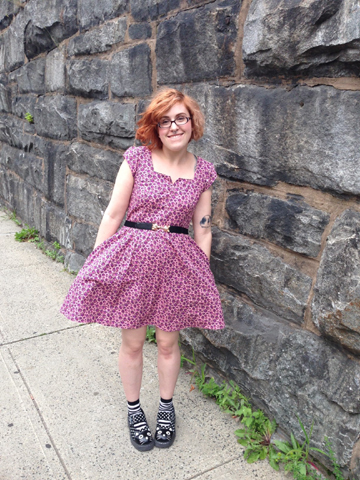
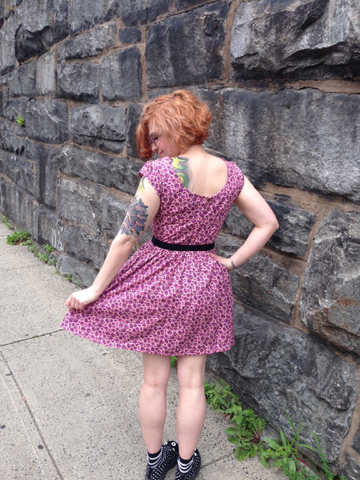
I finished the day after the deadline...but I finished my Outfit Along dress all the same! photo 3I went with the official OAL pattern, Simplicity 1803. This is bodice view C with cap sleeves. I cut a 6 on top and graded to an 8 for the bottom, since the finished measurements for the waist on a size 6 was my exact waist measurement and I wanted to have room to move, but I probably didn't need to do that as I wound up taking out a lot of ease at the waist when I put the zipper in. I also made the adjustments for petite ladies because I'm short, yo. The only other mod I made to the original pattern was moving the pockets to the side seams where they BELONGED rather than keeping them in the weird princess seam panels along the front.

photo 1(2)The fabric is a Betsy Johnson floral cotton print I bought from Mood Fabrics, which was really fun because I could pretend I was on Project Runway when I got the package in the mail. It's definitely super girly, but I don't have any girly pink floral dresses! I wore it belted with my kitty shoes yesterday (for comfort) but I can totally see this with flats, sandals, heels, a slouchy cardigan in winter....lots of options.

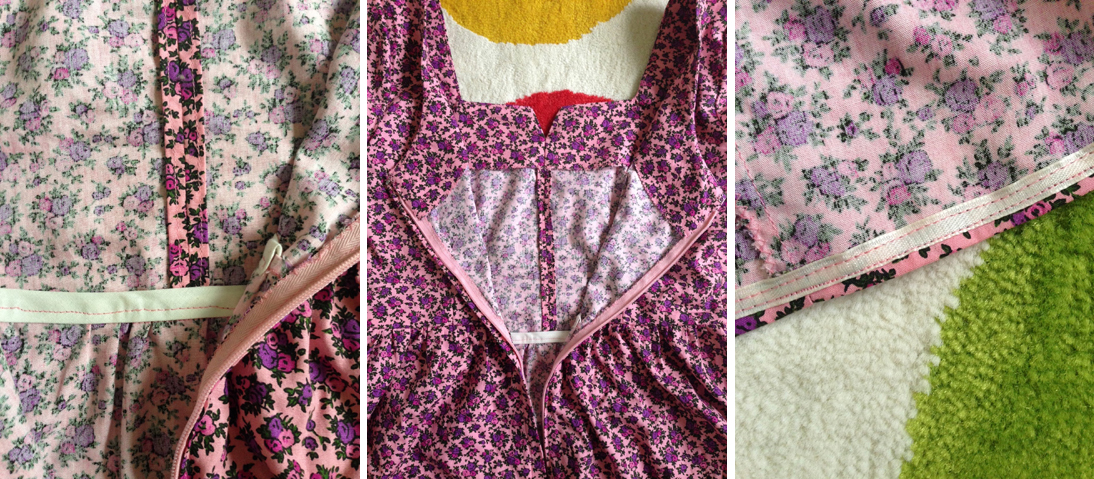
I am really proud of the insides of this dress! For those of you that don't know, I've been sewing since I was a teenager but I always made up my own patterns because I didn't have the patience and understanding to follow patterns. I even participated in a fashion show in high school with my own collection! I never finished seams and worked a lot with knits, where it didn't matter that I didn't finish seams. So this dress is pretty special to me since it's probably the first time I have followed a pattern to the letter AND did all those professional niceties to the insides.

insidesTo stretch my wings I used a variety of techniques. I did clean finish seams on the center and sides of the bodice, zig zag edges for the princess seams, skirt and sleeves, and a bound seam for the waistband with bias tape. (Plz to be ignoring my less than perfectly straight stitching on the waistband and hem.) For the hem, I chopped a bunch off since the dress as it stood was too long for lil ol' me, but I calculated wrong and chopped too much off to do a turned hem. Thank god for Lauren and her wonderful OAL posts--I stole her idea of hemming using seam binding! I used some cream ribbon I had on hand to match the waist binding, though by that point I was pretty fed up by fussing with the hem so my stitching is terribad. You can't see the thread from the right side though so IDGAF.

You'll notice I didn't make a full outfit--I have enough knitting to do for work that I wasn't up to knitting an accompanying piece. I am so glad Andi and Lauren put this together though! I feel like my sewing mojo is in full swing and I am super excited to add more pieces to my handmade wardrobe.

It's KAL Time!

Looking for some knitting motivation? Join the Accessorize Yourself KAL! From August 15th to September 30th, choose any of my accessory patterns and knit along with us in my Ravelry group. My currently available self published accessory patterns will be 20% off from now until the start of the KAL with coupon code ACCESSORIZE, so if you've been waiting to pull the trigger on one of those designs, now would indeed be the time! Of course, I am offering lovely prizes to the victors. The grand prize for one lucky person will be a one-of-a-kind skein of Valley Yarns Charlemont Hand Dyed, a Blue Sky project bag and 2 free patterns of their choosing (from my self published patterns only) from now until the end of 2014. You'll want to save at least one of those because I have some awesome fall releases coming up!

KALprizeAn awesome OOAK skein!

I'll also pick two runners up who will each receive 1 free pattern of their choosing, same stipulations as above.

Head on over to the KAL thread and join in! What better way to close out summer and kick off fall right than with a beautiful accessory and sparkling Internet conversation, eh?